How to remove tile adhesive
Removing tile adhesive is an essential step in preparing surfaces for a fresh installation or repair, and when during an application to ensure the finished result is as clean and professional-looking as possible.
Whether you're needing to remove old floor tile adhesive, or are tackling a small, problematic wall, following the right process ensures your project runs smoothly. Here’s a comprehensive guide sharing the best way to remove tile adhesive, to help you get started.
Why removing tile adhesive is important?
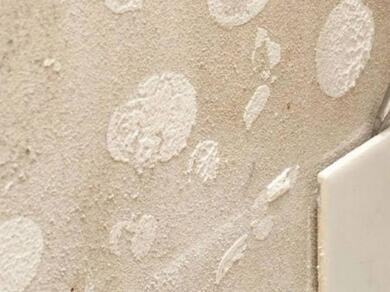
Although tile adhesive varies in types, it's common properties are that it has high strength, great adhesion and water resistance. Therefore, once fully cured, it can be extremely difficult to remove, especially once set in place for some time. The problem with leaving old adhesive in place can cause many issues including:
- Uneven surfaces, leading to poor tile alignment.
- Weak adhesion for new tiles, risking damage over time.
- Aesthetic issues if tiles are reinstalled unevenly.
Proper removal ensures a smooth, clean surface ready for new adhesive or alternate finishes.
Planning your tile removal
Before starting to remove tile adhesive, it's important to plan to consider the following factors:
- Tile type: Ceramic, porcelain, glass, or natural stone tiles may require different techniques.
- Surface type: Is the adhesive on a concrete floor, drywall, cement board, or plywood?
- Tools required: Common tools include a scraper, chisel, hammer, but more difficult tile removals could require an oscillating tool.
- Preservation of tiles: Are you trying to preserve the tiles, the substrate, or both?
- Work area: Consider ventilation for indoor spaces.
- Protection: Wear gloves, safety glasses, and a dust mask for safety.
Instructions
Tips for preserving tiles
Whilst you're removing old tile adhesive, it's important to consider if you want to try to preserve the tiles for a future project. If so, use our handy tips to help you keep them in good condition, ready for their next installation:
- Work carefully to avoid chipping or cracking reusable tiles.
- Use a chisel or suitable scraper with rounded edges to minimise damage during removal process.
- Soak tiles in warm water for a few hours to loosen adhesive on the back.
Final thoughts
When removing your old tiles or tile adhesive, remember these key three steps for a smooth-sailing project:
- Always test a small area before starting the full removal process.
- Plan adequate time for cleanup and surface preparation.
- If in doubt, consult a professional for large or complex projects.
That's it! You've discovered the best way to remove tile adhesive and using our tips and tricks, have a smooth surface to start your next project: your new tiling installation… Need a helping hand with that too? Follow our step-by-step guides for how to tile a floor using powdered adhesive or how to tile a wall using ready-mixed adhesive.
Disclaimer: This page contains AI-generated images for illustration purposes only.
FAQs
I have damaged the substrate below, what do I do before I install my new tiles/finishes?
Patch any holes or cracks with appropriate filler before reinstalling tiles. Ensure to allow it to dry until fully cured for maximum results.
I am experiencing excessive dust during the tile adhesive removal
Dampen the surface lightly using a bucket of warm water and a sponge, while scraping to reduce dust.
The substrate I'm left with is uneven!
Sand or level out imperfections using a grinder, after adhesive removal to get a smooth, clean surface.
Can I tile over old adhesive?
It’s not recommended. Old adhesive can compromise the bond and cause uneven tiling.